Polymer Clay Key Chain

Get in early with this Chrissy Gift Idea!

It is that time of year again when we all start to think about gift ideas for friends and family for the festive season. I always like to give my close friends, colleagues and neighbours a little something to show how much I have enjoyed the year we have spent together and to show some appreciation for their assistance, friendship, and love. However buying lots of little gift surly adds up and at this time of year it can be hard to find the right items or stick to a budget. This year I have not had to spend a lot of time thinking about what to buy or what to make as I think I have come up with the perfect gift idea.

img_5422

I had just packed up my left over polymer clay beads and clay packs to make room for another project on the go but found myself getting this all back out to experiment with this little fun and super easy gift idea. I do enjoy the feeling of working with this clay and the idea of a fast and effective present, a quick afternoon is all it took.

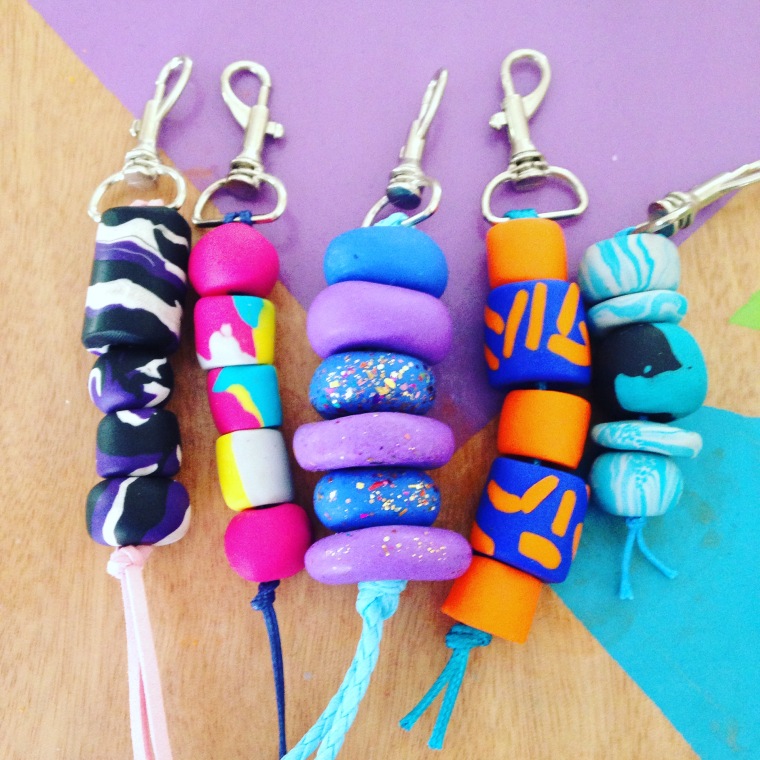
Polymer Clay Key Chains. 

All you will need is:

-Polymer clay in your choice of colour. I have experimented with what I had left over but will be heading to the shops today to get some new colours. Experiment with as many different methods as possible, mix the colours, cut things out, stick it back together. After all it is like adults play dough. Use it like a child would.

-Polymer clay tools. I like to use some of my sewing tools like punchers as I call them. These make good holes, but a skewer or a sharp pencil works well. I also use a rolling pin (Nonstick), backing paper, wooded board for woking on as some colours will leave a mark.

-Paint or nail polish to decorate or add details. I love spray paint as it is fast, bright and easy to use and super quick to dry. The spray paint brands from art shops are best even though they are a bit more pricy, they dry faster and give a nicer coverage.

-Oven and tray.

-Keychains, rings and rope (String or leather cord)

Get started:

Getting started is super easy. warm up the clay with your hands until it is of the correct constancy, you will know as it is easy to work with and roll out. Depending on the shape of the bead or keychain you may either use your hands to roll a ball or a rolling pin to roll out a shape. As I’m sure i have mentioned before I am far from a perfectionist, I like my beads to look handmade and a little variation is charming.  You want your friends to know this item was handmade with that look of shop bought. Cookie cutters are super for getting a range of shape such as circles and hearts. And they save time.

When you have created the desired bead shape place it on non-stick paper on a baking tray and follow the directions on the pack. Usually a cool oven for about 30 minutes. Let dry and decorate or leave and thread. I tried a few different ways of looking and knotting. See which one works for you but make it tight so they don’t fall off.

I string my beads up with leather strap or a cord. Use something that is heavy duty and will with stand strain. You want your gift to last the distance.

Pressed Flower Mini Art

The art of pressed flowers takes me back to being young and growing up in the 80’s. I know pressing flowers and making them into art has been around for centuries but I feel it is a big part of every girls childhood, hence taking me back to the era of fishnet gloves, large hair and matching outfits.

I have two types of flower pressing machines. One a modern one and another is an old one my nana gave to me. This one holds sentimental value as well as doing a good job at pressing all types of flower varieties. However if you doing have a press you can use a book or even experiment with using the oven or microwave for a quicker result. If using a book I would recommend placing the flower between two sheets of tissue paper to protect the pages of the book.

Once the flowers are pressed and dry you will get a better idea as to which varieties work best and which ones hold their colour.

Turn your flowers into any type of art you like. I have been experimenting with using mini canvases at the moment. 5cm is my favourite. The flowers always seem to turn themselves into butterflies.

IMG_5503.JPG

IMG_5511.JPG

IMG_5520.JPG

IMG_5505.JPG

Mono Printing with Children

There are so many fun ways to crete art with children. I love how children don’t see things as they are. For example a box holds endless possibilities for their imagination. Recently my toddler has become a box enthusiasts. We have things made from boxes all over the house. I have begun to hid them so we can reduce the amount of clutter they all bring. But to see him riding his box horse called Pebbles or sitting in his fire truck is the best part.

The other day however I wanted to experiment with some extremely messy printing work with him so I prepared the room. Drop sheets, plastic table cloth, art smock and all the tools ready at hand so I didn’t have to leave him with the paint while I went looking for equipment.

I had bought some Gelli pads from my classroom and let the older students go nuts with them. They couldn’t get enough and neither could I. It was the easier and quickest was to get a solid, bold print. The gel pad holds the colours and the ink so well. Using the water based acyclic paint you have at home woks wonderfully. It is easy to set up and easy to clean up.

I was surprised at how well my toddler went using the roller, scrapper tools and paint as well as the printing with paper. He had a ball.

The outlay for the pad is the most expensive part at approximately $50 for a small one. I believe it is worth if for the hours of fun you can have. IMG_3910IMG_3911IMG_3915IMG_4037 (1)IMG_3933

Weaving on a Circular Loom

I stumbled across the most precious little circular loom. It was laser cut out of wood, small and delicate and had the most natural smokey smell. As soon as I saw it I knew it would make a lovely travel craft tool. Fit in your pocket, take with you easy to store craft items are always hard to find.

I begun to weave using a range of different wools, strings and threads. Anything i could find or source from a thrift shop (Such a fantastic range of wool that has been unwanted, and oh so cheap).  I already had so many ideas of what I would use these mini weaves for. Gift wrap decorations, christmas decorations, decorations to hang with my larger weaving and more decorations.

When I had finished the weaving I unhooked my final piece and was a bit disappointed as it all curled up like a mini bowl. As it is a circle shape and was so tight I found that they always ended up in this bowl shape. Still cute but not what I had planned. I was a little disappointed with the end result but still found them to be cute as christmas decorations and for gift wrapping. They where quick and easy to make on the run or while watching tv. Give it a go and see for yourself. IMG_3855IMG_3856IMG_3859IMG_3860


Screen Printing Workshop

A few months ago I attended a Screen Printing Workshop. I have always enjoyed screen printing and dabble in the arts occasionally. I have a little screen, a paint scrapper I use as my squeegee and some small pots of paint that I update every so often. I had my eye on a course for a while and finally thought I should just shout myself for my birthday.

The course was designed so students could get all of their Christmas presents out of the way and have a number of lovely handmade gifts to share with friends and family. This was the selling point for me.

I also love to mingle with creative people who share a love of creating, learning and experimenting.

The course was at an old warehouse turned large shared art studio space in Brunswick West, Melbourne, Victoria. The space is called ‘Home Work’. The space is lovely, light and filled with creative inspirations. It makes you just want to create.

Over the span of two days we had the chance to cut stencils, print, design and print. It was super fun. It was a great course for all ability levels from beginners to experienced screen printers. Especially those who lack the space, time or enthusiasm to get started.

I also left with some beautiful christmas cards, pillow slips and tea towels. They made fab Christmas gifts. I’ll definitely be thinking about taking another course soon.

God’s Eye Tutorial

I have always loved Mexican art, Frida and the colours and styles of the architecture. They are very expressive and bold with colour, texture and images.

While planning an art unit for some students I wanted to create an activity where the students have to create an art items by looking at pictures with no written instructions. The idea of students creating a God’s Eye fitted into our textile unit.

Here are the images that they students will be following. I hope these inspire you to do some weaving and create one of these special pieces that warn off evil. Im sure we could all do with something like that in our houses.

Experimenting with Natural Dyes

I love using natural items to create and experiment with. Dying with natural dyes is an old tradition that has been used for centuries. It is a fun activity to do with children and with adults.

I have experimented with lots of different process and techniques to achieve different patterns, used different fabrics and different products to get different colours. One reason why I love this activity so much as each batch varies. Each piece is individual.

Some of the best foods to use when dying are:

Beetroot, onion skins, berries, turmeric, saffron, tea, coffee, cherries, red cabbage, pomegranates and purple grapes.

These are just a few of a very long list of items that can be used. I like to use the off cuts of veggies so as not to waste food. It is fun to experiment and mix food together to see what colours you can create. The possibilities are endless.

I usually use calico or a natural weave. If your going to buy products look for a cotton fabric so the dye will penetrate it.

String, rubber bands, hair ties or raffia can all be used to create patterns on to the fabric. This is a fun area to experiment with also.

I have also experimented with boiling the fabric with the dyes or just leaving the fabric over night. I also mixed salt into the water to help the fabric hold on to the colour. Boiling gives a stronger colour in a shorter time span but again I think it is worth experimenting with.

Shibori is an ancient form of Japanese dying using the indigo dye. To create many different patterns in the fabric many little stitches are made using a needle and thread then unplugged once the fabric is dyed. This is also something to experiment with.

I hope this helps you get started with some natural hand dyeing at home.

Once you start, you will be looking for natural dyes everywhere.

x

Beth


Art on the Road

I always pack a selection of art and craft items when I travel. The amount and type vary depending of where I am going and how I am getting there. On a recent trip to Queenscliff I didn’t take anything as I didn’t think I would have time to do any art. When the weather turned bad and some of the activities fell through I was annoyed with myself for not being prepared. I started seeing inspirations everywhere and wanted to record them. I found myself looking for an art supply shop or a newsagent to buy something to get me by. A pack of watercolour pencils, some felt tip pens and a new mini sketchbook was all I needed.

So when I am prepared and know I’m going away for a while I have a few go to items that I pack.

A small pack of watercolour pencils is essential as well as a pad of paper or a journal. I also pack a travel watercolour pallet, some brushes, felt tip pens and a nice set of lead pencils. A pair of scissors, washi tape and some glue will also allow you to glue, cut and add to your journal along the way. These items will also add some fun and can be used if you want to scrap book your travels.

It will really depend on your art style as to what you will be taking on your travels however if  this is all new to you or if your packing for children these items would be enough to inspire them to get creative while on the road.

When packing for my toddler I always pack some safety scissors, glue stick, fat pencils or crayons and my instax camera so I can capture the adventures and let him create his own postcards, travel diary or posters. I love to then add these to my visual diary as a memory of his age and his art creations at the time.

Adding your Children’s Books to the Bookshelf

We have been going through a make a book stage at our house. My toddler loves to staple, glue and stick anything and everything. He also loves to paint and print (like most toddlers). Our house however is getting to the stage where we have no more room to display artwork and we would like to have some areas free for toddler art.

I also don’t want to throw out this artwork as I’m sure one day I will want to look back and be reminded of what his hand looked like when he was two or how great a job he did when using a Gelli pad for the first time (New post on Gelli pad are coming soon). So I have started to compile his work into books. Almost like a scrap book (I don’t really like what this term refers to now) more like a visual diary collection.

As well add this we have been using some very cute concertina sketch books to make our own stories. We have used pencils, markers and watercolours so far. I get them out when I know he needs a rest but still is being active. I assist with the use of the tools and then add the words to represent the images. He uses the equipment in his art trolly to create masterpiece after masterpiece.

Since putting together a small collection of personal books we have spend many hours reading them and looking at the words and pictures.

Give it a go and you will be surprised with the love and joy shown when reading or showing off the special book.

Any activity that can help to install a love of reading and learning is a winner in my book!


IMG_9544.JPG

IMG_9541.JPG

IMG_9546.JPG

Making an Outdoors Play Space

My toddler has decide he just wants to stay home and play. When asked if he wants to go swimming, go to the shops, even playgroup he replies with ‘no mummy, play outside’. This is fine by me as we all love our backyard and working in the veggie patch or garden is a supper fun hobby of mine.

So over the weekend we decided to have yet another working bee and add some features to the toddlers cubby house he got for christmas to make him a proper outdoor play area.

We had been given some fake turf in a rang of colours as well as having some free left over from another project so decided this would be the basis for our design.

After a trip to the hardware shop and a sausage in bread for the meat eaters we headed home in some wood and screws in tow.

We didn’t really know how this project would turn out but I did have an idea in my head for what i envisaged. Many hours spent playing dinosaurs with leaves, twigs and building caves with rocks and old opts. The image seemed so fun. So we started the build. Lucky the toddler headed off for his nap leaving the adults to work away at an alarming rate to get the area ready for the spurs reveal after the afternoon snooze.

The end result was pretty similar to what I had planned. But as aways as we worked away more and more ideas come to our minds on what the areas needs, so we will be spending a few more weekends out on the tools turning the back corner into a toddlers paradise.

IMG_9452.JPG

IMG_9453.JPG

IMG_9451.JPG